
I’ve recently taken up the hobby of beekeeping. Why? Well, after some study I’ve become fascinated with the structured social order of bees. These little critters band together with the sole purpose of insuring the survival of the group. This extends right down to the willingness of worker bees to commit suicide when the hive is threatened (most ‘domestic’ bees are very non-aggressive, attacking and stinging ONLY when it appears that the integrity of the hive is threatened). Yes, when a worker bee stings (in defense), the barbed stinger rips the guts out of the little fellow, and she dies quickly afterward.
A few bee facts that I’ve learned:
A typical hive contains some 50,000-70,000 bees. Almost all of these are the worker bees, which are exclusively female. That’s right guys, the males, or drones, are kept around, in limited numbers, for one purpose only… to mate with the queen. Since there is only one queen per hive, demand for males is extremely limited. Drones are pretty helpless otherwise.. they can’t sting, they can’t forage for nectar and pollen, and they are completely dependent on the feminine quarters for food (sound familiar fellows?)
The queen mates just once, and is then good and tanked up for her entire lifetime, which can be 3-5 years. During her life, she never leaves the hive, just works all day, laying some 1500 eggs daily in the cells prepared by the workers. She is totally pampered by the workers, who constantly feed, clean, and groom her.
Worker bees (females), by contrast, only last some 45 days during the temperate seasons. In the dormant winter season, a worker can live about 4-6 months. They literally work and fly themselves to death: one worker has to visit about 1,000 flowers to be fully “tanked” up for the return trip to the hive. Just to fill a single cell in the hive with honey requires the LIFE’S WORK of some 60 bees. It takes some 2,000,000 visits to flowers to make a single pound of honey. (and you complain about YOUR job!)
The bees keep the inside of the hive at a constant 93-95 degrees all year long. In the summer, certain bees are assigned “fanning” tasks to cool down the hive as needed.
I have two hives this year. If all goes well, I’ll be harvesting a limited amount of honey in late fall (some honey has to be left in the hive for food during the long, flower-less winter).
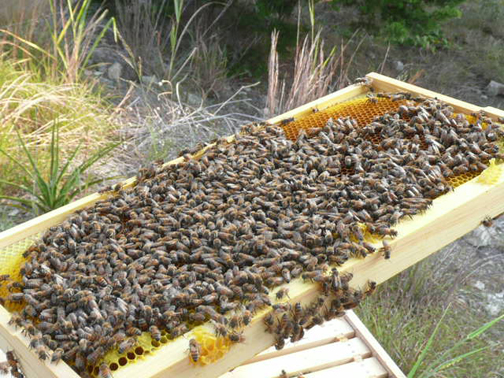
Here are a few pictures from my hives. Each hive began with a small “package” of bees of about 10,000, back in mid April. Already you can see how the hive has grown in size, and how many cells of both new bees and honey have been created since then:

If all goes well, I should be able to produce some honey for friends within the next year. My label is all ready to go!:

UPDATE – MAY 18, 2010
Well, today I did it. Beginning my 3rd season with bees, I decided on the spur of the moment that it was time to shed the gloves. After all, how can I have a relationship with bees if I don’t exhibit some trust?
I’ve already been stung twice in this time frame, both times THROUGH protective clothing, so I’ve come to accept that the occasional encounter with a stinger is a small price to pay for the experience (and much less so than the poor bee, who has to commit suicide to use his stinger).
I put on my hooded jacket (even the pros always seem to at least have a hood… I’d hate to battle with a bee trying to get free of my hair!), fired up my smoker (this part is absolutely mandatory, as it imparts a necessary and immediate calming effect over the bees), and headed out to the hive(s).
We’ve separated our two hives this year, one in the back meadow, secluded among the trees, and the other in the front side yard, near our new garden. It was an eerie feeling knowing my hands were exposed as I opened the hives. But, as I expected, a few bees flew in the air, but most just went about their business working on the frames. Pulling out a bee-covered frame with bare fingers, and bees crawling all over them, is a, well, tactile experience at best. Amazingly, the bees seemed very tolerant of my existence, and let me intrude into their spaces without aggressive behaviour (i.e., no stings… yeah!) Now I’m beginning to feel like a real beekeeper.
The meadow hive colony is now entering its 3rd year, and going very well. The second full size super is now about 3/4 full of honey, and the smaller, honey-only super is now starting to build out. I’ve very optimistic I’ll have excess honey to distribute to friends this fall, or sooner!
The second hive experienced an unexplained colony meltdown last year. Although the queen was visibly in residence, there were just no new eggs/larvae being produced, and the entire colony finally expired of old age. This was when we decided, early in the spring, to move the hive and its remaining small colony about 100 yards away, and in a pleasant location near our garden and underneath shade trees. As expected, all the remaining bees lost their way to the moved hive (they can only find their home hive within about 10 yards or so). This seemed a more humane approach than having to exterminate the small colony, otherwise there would have been a major battle when I introduced the new package of bees and their queen in mid April.
The new colony is doing very well. The queen (marked on her back with flourescent paint by the breeder) is clearly holding court, the bees are busy as ….. well, you know. In short order, the new colony has put its brand new house in order… drawing out comb, the queen laying eggs, workers feeding and stashing away pollen, etc. Today when I visited, there were many many open cells with tiny larvae inside, just waiting for the final filling of pollen and capping off with wax until the new bees emerge just a week or so later.
Ahh… life is good in the country!
Update – June 21, 2010
Well, my no-glove policy ended quickly. This week my brother-in-law from California was visiting. He manages a couple of hives also, so I asked him to suit up in my spare bee suit and join me in inspecting my two hives. I’d been stung once just a week or so before when I was exchanging a feeder in front of one of the hives (which I do WITHOUT gloves, veil, or suit). One little critter decided my presence was a menace, and left a nasty sting right on my thumb. With that experience impressed on my brain, I decided this day with Tim would be a gloves-on day.
Tim and I approached the first hive, smoked it properly, and removed the lid. At first, the bees seemed pretty docile, but then something seemed to agitate them. Next thing we knew, I had been stung once THROUGH my glove, and once through my Levi’s, and Tim had received 3-4 stings through his glove. A very hastily-called beekeeper conference concluded that the prudent thing to do was to close up the hive and move on. After departing the area, I then noticed some 3-4 additional stingers embedded in my glove, as evidence that the colony really didn’t care for our presence.
Fast forward to the next hive. Darn if we didn’t experience the same aggressiveness. When all was said and done, Tim wound up with some 10 bee stings on his hand. Yikes! More smoke, slower movements will be in order for the next visit!
HONEY I LOVE YOU! July 20, 2010
Hooray! The time has finally arrived! Almost 3 years since I started my first hive, I have HONEY to harvest! My hives have had their birthing struggles. The first hive suffered from a lost or feeble queen, and got off to a very slow start the first year. During the next year, I added a second hive, which also apparently had a weak queen, and that colony pretty much completely died out. Mix in the worst, hottest summer ever for bees in 2009, and there was scarce excess honey to be had last year. My strongest hive had stashed away enough to winter over, but not enough to share.
This year has been different. My now-3-year-old hive colony has grown and prospered. Additionally, a very nice, wet spring and summer have contributed to an abundance of pollen and nectar. The end result? A nice little stash of ready-to-harvest honey.
Thus it was that, about a week ago, I opened the hive (no stings this time, thank you). The nearly full and shorter-in-height “honey” super sits on top of the hive, with a mesh “queen excluder” between that super and the lower “brood” supers below. The role of the queen excluder is, as the name implies, to prevent the much larger queen from entering the honey super and laying eggs. Therefore, the worker bees store nothing but pure honey in these supers… no pollen, no eggs, no larvae, just PURE HONEY.
My first job was to get all the worker bees to exit the honey super so I could remove the entire super without fighting bees, and help myself to the golden bounty. To do this, the wooden inner cover, which normally sits on the very top of the hive (underneath the exterior lid). This cover has just a small oblong hole about 2 inches long cut in the center. In this opening I place a little plastic and metal “bee escape”. This little gadget is like a one-way trap which allows bees to “escape” the honey super, but then they can’t go back in. Since the bees are always, well, BUSY, they don’t spend much time in the honey super…they just do their business, then move down through the brood chamber to exit the hive at the bottom for their next task. Usually just 4 or 5 days is necessary for virtually all the bees to exit the honey super, leaving it ready to be moved to my “honey processing room” better know as the garage.
Commercial beekeepers are much less patient than me, and don’t want to wait a week to get to the honey when it is ready, so they use a “fume board” instead. This is a board that is infused with some sort of noxious concoction so repelling that when placed on top of the honey super, forces the bees to abandon the super pronto, down to the lower chambers. To me, this seems like harsh treatments for these little critters who have worked hard to produce this liquid gold.
After positioning the bee escape board underneath the honey super, I then sit the loaded super and escape on top of a new, empty honey super, (with the queen excluder underneath that) so that the bees can continue their task of making and storing honey.
The following week I returned to the hive, and, sure enough, with the bee escape in place, there were no more than maybe 15-20 bees total still left in the honey super. Using some smoke to placate the bees, and a couple of whacks with the super on the stand sufficed to encourage the remaining bees to move on, so I was able to close up the hive, sans the honey super, and move the entire super, with its ten frames, into the “processing room”.
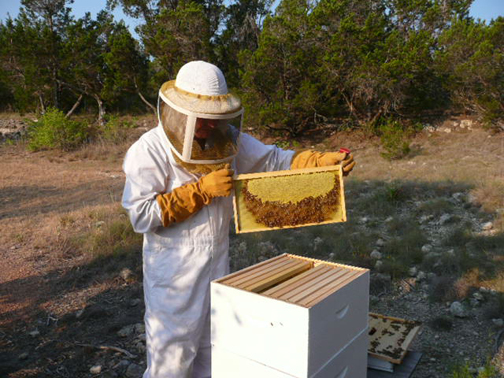
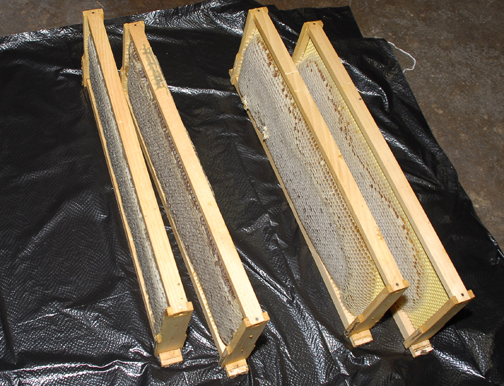
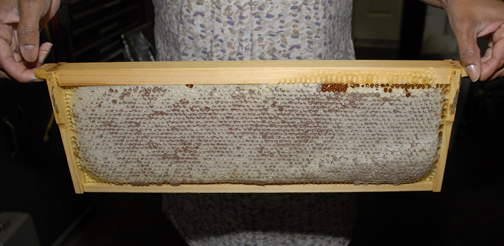
After examination of all the frames in the hive, I selected 4 which were pretty completely filled on both sides with honey, and all the cells were properly capped with wax:
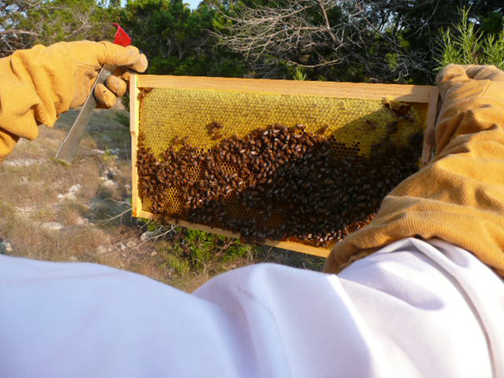
Here’s what one of the fuller frames looked like before processing:
The next step in the process involves removing the wax cappings from all the cells in the frame. This is done with a special uncapping knife, which is long enough to span short or long frames, and has a serrated edge to assist in scraping off the wax covering, leaving the pure honey underneath. A more sophisticated (and more expensive) uncapping knife is electrically heated, to melt the wax covering, but I found the simpler manual version to work quite sufficiently.
Once “uncapped” the frames are placed, two at a time, in a special centrifuge (handcrank operated in the case of my budget unit) called a “honey extractor”. This extractor is constructed inside a large plastic tub, with a valve at the bottom for transferring the honey out of the extractor.
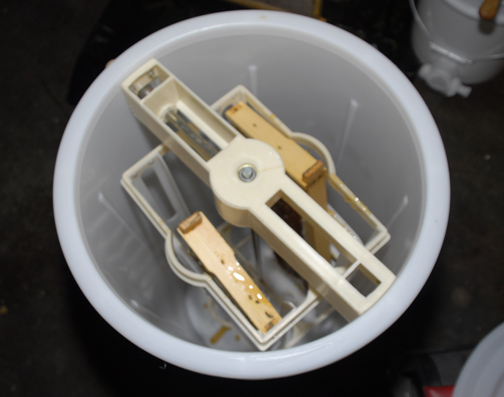
It only takes about 30 seconds or so of serious hand cranking to literally wring the honey out of the frames, against the wall of the extractor, and then down to the bottom of the container. Remove the frames, rotate them so the inside surface is now facing toward the outer wall, and complete the extraction for the other side of the frame.
Once the extraction process is finished, the container is placed over a special honey filtering bucket, the valve is opened, and for the first time you get to view the luscious, golden brown nectar of the gods pouring into the final container:
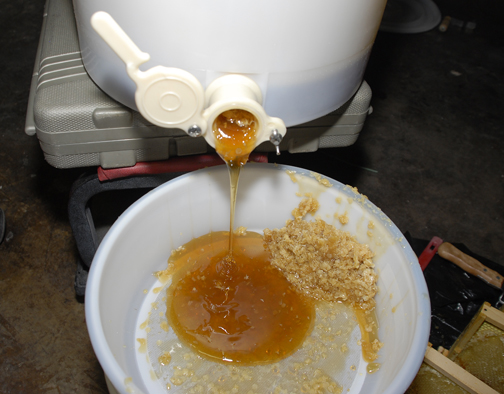
The material piled up on one side of the filter basket is the wax cappings from each frame, which, of course, also has lots of honey in it, so all was put in the basket to capture every last drop of honey. Some people prefer eating their honey “comb-in”, including the wax, but I’ve decided, due to the limited quantity of harvest, to just stick with pure honey.
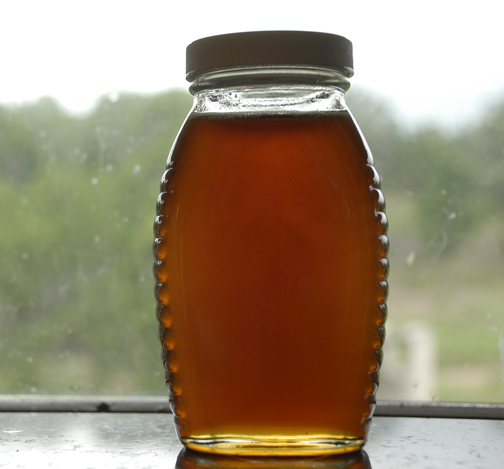
When all was said and done, my 4 frames of honey yielded 12 1 pound jars of beautiful, clear, tasty, Hill Country Wildflower Honey.
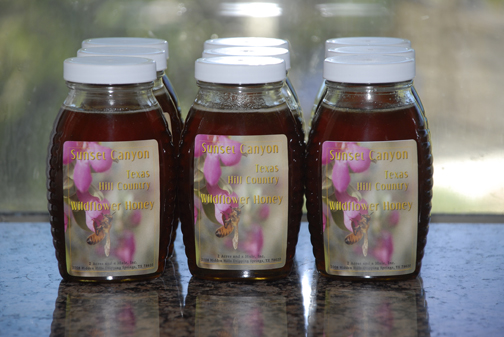
It’s not a huge return for my 3 year-long effort, but it is very rewarding to see the end results. I then have to be reminded that it takes 60 workers their entire LIFETIME just to fully fill a single cell with honey! And, according to the experts, my 12 pounds of honey required approximately 24 MILLION visits to flowers to create. Truly an astonishing feat for my little colony!
Next year, I expect that my second colony, which is growing rapidly and looking very healthy, will join in the production cycle, and I will have ample honey to share with all my friends!
BEGINNING YOUR OWN HIVE
Here are some things I’ve learned in my brief career as a beekeeper (and by no means should this be considered expert opinion!):
WHAT YOU WILL NEED TO GET STARTED
-
Lots of patience (I’ll soon be into my third season, and yet to harvest any honey, but optimistic that next year my hives will be far enough along produce.
-
At least 2 hives (trust me.. I know they are a bit pricey, but you’ll have better luck with two hives, and have something to compare each hive’s progress against).
For each hive, I recommend getting at least one full-side brood box, and two additional “supers” for starters. I’ve had pleasing results buying my hives from Rossman apiaries http://www.gabees.com . Their hive kits are reasonably priced, and made of weather resistant cypress.
-
Package Bees and a queen for each hive. These should be ordered from your closest supplier in December or so, for delivery in late spring, depending on your region. (Although I’ve not had experience, I’m thinking that a bee “Nuc” (nucleous colony) may be a better way to get started. With a Nuc, you’ll actually get several hive frames with new bees in the making, along with the associated worker bees and a colony queen. In this way, your bees will have a head start, as they won’t have to spend the first few weeks just building the wax comb and starting off bee larvae. Nucs are generally available from the same sources as bee packages.
-
A smoker, and fuel (I use both the fiber “logs” and the small pressed wood pellets, in combination).. light them off with a propane torch. Spring for a stainless steel model if you can, the steel ones will be rusty within a year!
-
A “hive tool” This is just a tool to separate hive bodies and frames apart, similar to a molding puller (but NOT the same… get the correct item, you’ll use this every time you visit the hive). Many books recommend buying two, in case you lose one. You really can’t open the hive without one.
-
A bee brush. This is really handy for gently removing bees from various surfaces (including your sleeve!) when opening the hive.
-
A feeder, for long winters and for getting started. I prefer the simple and inexpensive “chicken water” style which uses a canning jar with perforated lid.
-
Bee food. I bought stuff from Dadant www.dadant.com which you mix with sugar water, or form cakes for the bees. This is for those long winters, or dry flower-less summers like we have here in Texas.
-
A bee suit including mesh head covering. I’ve got several, finally settled on the upper “jacket-style” rather than a full one-piece coverall. Much easier to get into, and I find a good solid pair of jeans works just fine for the lower body. I bought mine at Dadant Beekeeping supplies www.dadant.com , it comes with a fully integrated hood and mesh front which just zips on the jacket. Consider buying a second complete jacket, as you’ll surely have spectators who would like to see the hives from time to time.
-
Bee gloves. Don’t cheap out here. Spend a little extra and get a nice leather pair that will make working with the bees easier.
-
A good beekeeping book or manual. I’ve gotten good value from : “The Backyard Beekeeper” and “Natural Beekeeping”
-
When it finally comes time to harvest (no need to spring for this stuff up front), you’ll probably want to buy a centrifugal honey extractor, as well as a poly honey pail with a spigot on the bottom for filling, and then a supply of glass or plastic honey containers, and labels. I chose to design my own labels, and found an online company that prints adhesive ones specifically for food products.
That’s about it! It’s a rewarding hobby, and one you can share with friends (at least the honey). Get those bees ordered!
SUPPLIERS AND CONTACTS:
BEES:
-
R. Weaver Apiaries – Navasota, TX (between Austin and Houston). www.rweaver.com I’ve purchased my bee packages here both seasons. I’m not sure about the relative vitality of the bees I’ve purchased, but they are somewhat close, and they do deliver as scheduled. You can either pick them up from the “farm” as I did the first year, mainly just to see the operation, or have them mailed (as I did the second year).. In both cases, the bee package arrived at my home with all those little workers in top shape. I don’t believe they sell “nuc” packages here.
-
B. Weaver also Navasota, TX www.beeweaver.com . Apparently B. Weaver and R. Weaver are related, but don’t talk to or about each other. I’ve had no experience with these guys, but I note that they DO sell “Nucs” (highly recommended) as well as bee packages. Might be worth a shot.
-
Randy Oakley – Manor Texas – (512) 981-9215. Randy is a member of the Williamson Co. Beekeepers Assn. He had an ad in the club newspaper in Sept 2009 for “nucs”.. 5 frames of bees and brood with a queen for $95…. great price. If I were starting a new hive, I think this would be my first choice!
-
Williamson County Beekeepers http://www.wcaba.org/.. Round Rock. This is a fairly active club, and they DO make mass purchases of bees for members (and possibly non-members also). Membership fee is nominal. This could be a good local source of bees. I believe they place a large order with a supplier in the area, and then all the packages are delivered to a central location near Roundrock on a certain day.. you just drive up and pick up your package.
-
Konrad Bouffard – http://roundrockhoney.com/ local Austin area beekeeper Round Rock..see CLASSES below). also coordinates club-style joint purchases of bees. could be a good contact for bee purchases (no personal experience).
-
San Marcos Are Bee Wranglers http://texasbees.com/buzz/san-marcos-area-bee-wranglers/ A beekeeping club in, you guessed it, San Marcos. See CLASSES below for additional info. Possible source of bees.
-
Google…. search for other regional bee suppliers. There are a number of reputable suppliers in the Southeastern part of the US.
CLUBS
-
Williamson County Beekeepers (see links above for bee suppliers)
-
San Marcos Area Bee Wranglers http://texasbees.com/buzz/san-marcos-area-bee-wranglers/
-
Round Rock Honey http://roundrockhoney.com/
CLASSES
-
Konrad Bouffard, konrad@roundrockhoney.com produces a series of fee-based classes on beekeeping each spring. I attended a series last year, frankly was underwhelmed with the lack of organization and presentation. On the other hand, the classes are pretty much geared for brand-new beginners, and do provide hands-on experience with hives, including providing all the bee suits, veils, etc, needed for the class. Not necessarily recommended, but presented here for reference.
-
San Marcos Area Bee Wranglers – presents a FREE 4-week beekeeping course at the San Marcos public library each January. The 2010 course begins the first Wed evening in Jan, 7-9 PM. Register by calling the library 512 393-8200
SUPPLIERS
-
Dadant Beekeeping Supplies www.dadant.com This company is one of the larger suppliers of everything for bees… suits, food, processing equipment, jars, you name it. I’ve had good luck. Prices are reasonable, and shipment is fairly quick. In fact, I’ve bought most of my supplies here except hives (see below)
-
Rossman Apiaries www.gabees.com This is my favorite place for hive bodies. The hives are constructed of cypress wood, which weathers well. I’ve found prices reasonable, and the quality good on their products. Order early, as order fulfillment is somewhat relaxed!
OTHER DRIPPING SPRINGS AREA BEEKEEPERS
-
Mike Chessmore mike@chessmore.com He has two hives right here in Sunset Canyon
This is wonderful! It has the perfect combination of text, photos and links. It’s very helpful. You have always gone “all out” when you became interested in something. I forgot to order my bee stuff last January but I will NEXT January. Thanks for sharing! Tom
Phil,
If this is bee-keeping, can brain surgery be far behind???
(Just a little joke.)
I’m totally amazed at your bee-keeping adventures.
Be safe.
Sammy Rahl Rusk
class of ’63